
Adding Preset Up/Down Footswitches to the Digitech GNX-1
By Stacey Jordan
Summary
The GNX-1 is a great guitar pedal. But, after using it for a while, I found the single bank/preset footswitch made movement through banks and presets too slow for live use. Even the existing Preset Up switch in FX mode was too slow. In addition, I often selected the bypass mode by mistake while in the performance mode. I bought the pedal because it gave more control over the different patches when playing live. So it was clear to me that the FX Mode was the mode I would most often use. Also, the dead time between switching in this mode was not as noticeable as Bank Mode.
To aid in the preset selection while playing live, I came up with a modification to add two switches that would allow me to move through the presets very fast in both directions with my foot. This change does not add any new function to the pedal, but just adds some switches in parallel with the existing preset/data up/down finger switches so you can conveniently use your feet to do the work. You'll get fast response for preset up/down selecton in either FX or bank mode.
I installed 2 push button switches just above the stock Amp select and Effect foot switches on the upper level of the chassis, as shown in illustrations 1 & 2. For your convenience, you may choose any other location that you like as long as you have enough wire to reach the switches.

Illustration 1. Completed Unit - Top View

Illustration 2. Completed Unit - Side View
Detailed Description
I will now describe the procedure to add two foot switches for preset up/down selection.
Important Note: This change will void your DigiTech warranty. Also, I make no warranty, claim, or guarantees regarding the performance of your unit after you make this modification. Any failures in your unit as a result of making these modifications is your responsibility. The changes described here are very simple and do nothing to modify the functionality of the machine. However, I cannot be responsible for any errors you might make in the process.
What You Will Need
- A small soldering iron and some solder. Use a soldering iron designed for IC jobs.
- 3 to 4 feet of 24-gauge wire. Solid or stranded wire will work fine, although stranded is preferred for its flexibility.
- 2 robust foot switches. They must be the momentary connection type (on while pressed, off while not pressed). Carling makes some excellent ones if you can find them. I happened to use Alco MPS203R switches which are momentary and double pole, double throw (or DPDT; SPDT would be adequate, so we won't use all the connections on the MPS203R). These are available from Newark. If you order the Alco switches, also get the plastic cap that snaps on to the shaft. A Carling-style footswitch is available at the Weber site under part number WSW-SPDT-MPB.
Procedure
- Remove the 7 Allen head screws that hold the top cover on the GNX-1 in place.
- While holding the unit together with your hands, turn the unit upside down with the back facing you.
- Lift the bottom cover up and move it forward out of the way. Note that there are cables connected between the main board (PCB) that is mounted to the bottom and the footswitch boards that are mounted to the top. You can keep these connected and carefully pivot the bottom cover back without disturbing the connections. Be careful not to flex the cables too much. Also keep touching metal things around you to discharge any static build up from your clothing. If possible, do this operation on an antistatic mat with an antistatic wrist strap, available from various electronics stores such as RadioShack.
-
Drill the mounting holes so the switch will clear the circuit board.
Drill straight and carefully and don't rush. You may want to place a
block of wood behind the section you are drilling at to get a
cleaner hole (see illustrations 3 & 4).
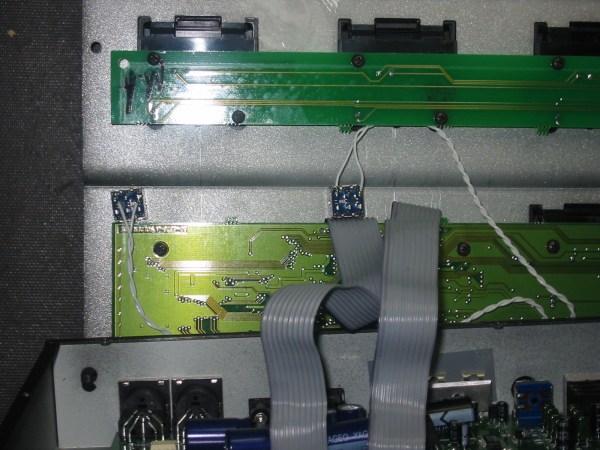
Illustration 3. Switch Wire Connections - View 1
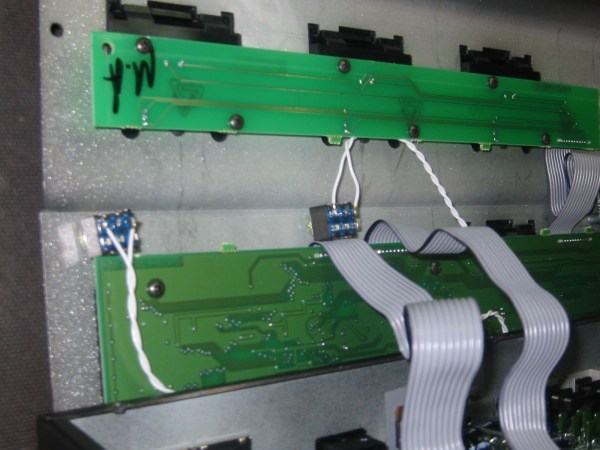
Illustration 4. Switch Wire Connections - View 2
-
Locate the Preset/Data Up & Down switches
on the front (or top) of the unit and find their location on the
bottom side of the circuit board. Solder the wires to the new
switches across the existing circuit board mounted switches (see
illustrations 5 & 6). The Alco switches are labeled “C”
for common, “NO” for normally open and “NC”
for normally closed contacts. You will wire the switches using the
“NO” and the “C” contacts. The Alco switch is a double pole, double
throw switch. You only need to use the one set of the contacts.
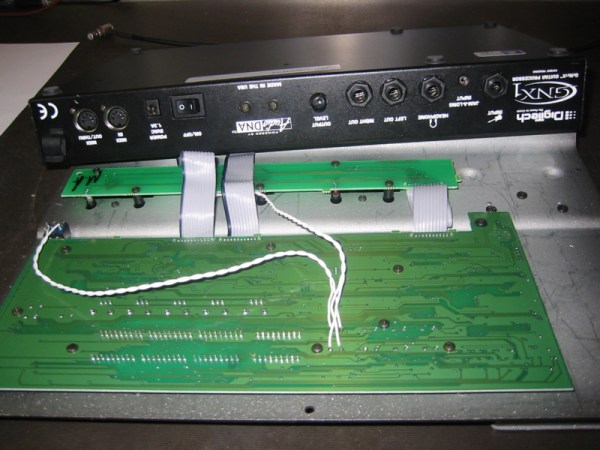
Illustration 5. PCB Wire Connections - View 1
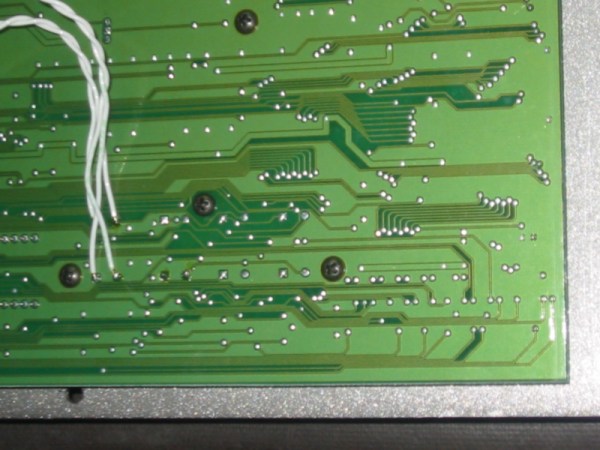
Illustration 6. PCB Wire Connections - View 2
So what are you waiting for? Go ahead and make a great guitar pedal out of a good one.
Stacey Jordan is a contributing member at the DigiTech GeNetX™ Sound Community forum under the name 'sj'.
You may download a PDF format (Acrobat Reader) version of this article. If you don't have Adobe Acrobat Reader, you can download it for free.

|
6,858 visits |
Last Update: February 7, 2015 01:59:21 PM EST
Article copyright ©2003 by Stacey Jordan. - ALL RIGHTS RESERVED
Web page copyright ©2003 by Mark Bratcher. - ALL RIGHTS RESERVED